These instructions are designed for GarageBand three plus the sounds of a symphony orchestra.
GarageBand is easy and fast still powerful enough to do film scoring.
Please, tell me if you observe anything every bit good!
Importing Beethoven into GarageBand

A unproblematic example
- I will show you a simple way to take chords from a piece of classical music.
- I like Beethovan so I prefer to take chords from his works whenever possible.
| Step #2 Stride ii - Drag to GarageBand - Later I download the midi file, I go to the finder and drag the icon of the midi file to GarageBand. This tells GarageBand to Import the file and assign it to multiple tracks in GarageBand.
- Note: If GarageBand does not accept the Midi file, I open the Midi file in QuickTime Movie Histrion and export the file every bit a Midi file (going from Midi file to Midi file). This cleans upwards the file and prepares it for GarageBand.
- Equally the file is imported into GarageBand, it expands greatly taking up very many tracks.
- Then I play the file.
| | GarageBand with the midi file 
click on picture show to enlarge |
| Step #3 Footstep three - Isolate the notes - I only want a small-scale department of the music. Therefore, I must isolate the notes I want otherwise the file will exist too large and awkward to work with.
- To trim the file, I select all the tracks and put the play marker earlier the notes I want. Then I select SPLIT from the menu.
- I do the same matter again at the end of the notes I am interested in. Now each track has three regions.
- Don't worry about accuracy. Extra notes can be eliminated later. Better to have as well many notes than not plenty.
| | A track can exist broken into regions 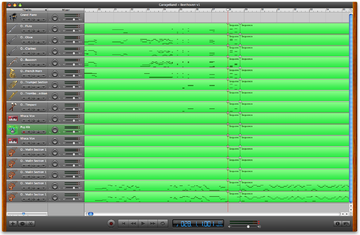
click on picture to enlarge |
| Step #iv Step 4 - Delete unwanted regions - Later on I have broken each track into regions, I advisedly select the regions that I don't desire and delete them.
- For this case, this is all I have left.
- Now, the file is much easier to piece of work with!
| | The same melody reduced to a few chords 
click on movie to enlarge |
| Pace #five Step 5 - Magnify the epitome - Now that I have elimiated everything except the chord, I magnify the image to full screen width.
- I apace run across that many of the tracks accept no notes. These tracks are empty.
- I get rid of the tracks which are empty merely by deleting the entire track.
| | Now I see the notes more conspicuously in GarageBand 
click on picture to overstate |
| Stride #half dozen Step half-dozen - Plough off ugly tracks - Now I have only the tracks with notes. However, nearly of the tracks are either not interesting or have instruments which I practice non find interesting.
- In GarageBand, y'all can plough off the rail by clicking on the icon for silencing the rails.
| | It is much easier to see without empty tracks 
click on picture to overstate |
| Step #7 Step vii - Select amend instruments - GarageBand uses general rules for importing Midi files. It assumes that all Midi files are designed for apply with General Midi sound modules. Therefore, the imported file will sound good but not ever great.
- I tin hands try each track using dissimilar musical instruments. I effort either to find better instruments or to endeavor to become totally different sounds. This function is really fun!
| | I accept a whole symphony orchestra to select from 
click on picture to enlarge |
| Step #8 Pace 8 - The finished file - Once I try all the tracks and change the instruments until I similar the final results, I eliminate the unwanted (unused) tracks.
- To brand some of the notes more realistic, I fade the notes out and sometimes I even fade the notes in so it sounds real.
- At present I have the final GarageBand file.
| | Adjusting note levels in GarageBand 
click on picture to enlarge |
| Step #9 Step nine - Catechumen to OGG - I consign the GarageBand file to an audio file. I open Audacity (or any audio processing program) and create a new page. I import the audio file and trim it if needed.
- I save the audio file to my hard drive. Done!
| | The notes in Audacity 
click on picture to enlarge |
| Title of two box section Listen to the music - Mind to the final result. I accept taking a long slice by Beethovan and extracted just one set of chords.
- This might seem like a lot of work for simply two notes. Just ii notes from Beethovan audio much improve than two notes from me.
- Thanks Beethovan!
| | Listen to this |


0 Response to "How To Add Midi To Garageband"
Post a Comment