

Blood Hematocrit Virtual Lab Answers
Principal Body
Blood Lab
Learning Objectives
- Explain hematocrit, including the significance of values exterior of the normal range.
- Determine hematocrit from a blood sample image.
- Explain the ABO and Rh claret groups and their clinical significance.
- Conduct blood typing on a synthetic-blood sample.
- Place and draw all formed elements in a man claret smear.
- State the relative proportions of formed elements in human blood.
- Demonstrate proficient microscope use.
Blood Composition and Hematocrit
Composition of claret
Overview of Claret [link opens in new window]
- 55% = Plasma
- Proteins (for claret pressure level, clotting, and immune functions)
- Water (92% of plasma)
- Electrolytes
- Hormones
- Nutrients
- Blood gases
- Waste
- 45% = Formed Elements
- Red Blood Cells (erythrocytes)
- Platelets (thrombocytes)
- White Blood Cells (leukocytes)
Hematocrit
- Definition: The book—reported as a percentage—of packed elements (mainly red blood cells) in a blood sample.
- Clinical relevance: Provides information nigh the oxygen-conveying chapters of blood. Low hematocrit means less red claret cells carrying O2.
- Healthy ranges:
- Male: ____________%
- Female:____________%


What is the hematocrit for this sample? ___________
Blood Typing
Blood Typing
Blood blazon refers to the presence or absence of specific molecules, called antigens, on the red blood prison cell (RBC) RBC surface. Antigens are molecules, such equally proteins, lipids, carbohydrates or nucleic acids, that your body can use to differentiate self and not-self. People with different blood types have unlike antigens on their RBCs.
Antibodies are produced in response to some antigens (non-self), and are generally used by the allowed system to recognize and facilitate removal of objects (viruses, bacteria, tumorous cells, etc.) that practice not vest in the torso.
There are more than fifty blood types in the human population. The almost clinically meaning are the ABO and Rh(+/-) blood groups.
The ABO Blood Group
A and B antigens are glycoproteins on the RCC surface. ABO typing does not affect a person'south Rh (+ or -) designation. Figure 2.iii Blood Blazon
Type A blood: A antigens on cell; anti-B antibodies in plasma
Type B claret: B antigens on jail cell; anti-A antibodies in plasma
Type AB blood: both A and B antigens on prison cell; neither anti-A nor anti-B antibodies in plasma
Type O blood: neither A nor B antigens on cell; both anti-A and anti-B antibodies in plasma
If a different type of blood is put into your bloodstream, the blood will agglutinate (clump) and hemolysis (bursting) occurs inside the foreign blood cells. Agglutination due to antibodies and antigens is a different process than blood clotting, which involves fibrin and other cascades associated with hemostasis.

Rh Claret Grouping
Rh antigens are named subsequently the rhesus macaque, a primate with many blood similarities to human. There are many Rh antigens in humans, simply the D type of Rh antigen is the well-nigh clinically significant. Because of this, in claret typing, sometimes D and Rh are used interchangeably. The Rh factor is grouped with ABO blood group to identify a blood blazon (case A+, B-, O-).
Type Rh+ (positive) blood: Rh antigens on cell
Type Rh- (negative) blood: no Rh antigens on cell
Unlike ABO blood type, no anti-Rh antibodies are nowadays in Rh- individuals unless they have been exposed to Rh antigens. If Rh+ blood is introduced into an Rh- private, anti-Rh antibodies will be produced against the Rh(+) blood.
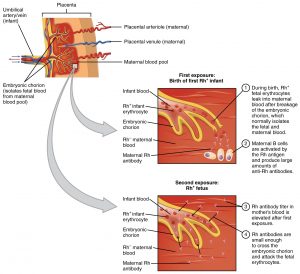
Importance of Rh during Pregnancy
This is a critical consideration in pregnancy for Rh- mothers if the fetus is Rh+. If any of the Rh+ blood enters the mother'due south circulation, the mother's allowed organisation volition produce anti-Rh antibodies that will hemolyze her baby'south blood (and any hereafter Rh+ fetuses). This is chosen hemolytic disease of the newborn or erythroblastosis fetalis. Information technology is prevented with RhoGAM, a dosage of anti-Rh antibodies, given to the mother at 27 weeks and inside 72 hours of giving birth in order to destroy any fetal blood cells in her blood so she will not produce her own anti-Rh antibodies. RhoGam antibody dosage is minor enough not to hurt fetus, but strong enough to proceed mom'due south immune system from attacking fetus. See Effigy 2.4.
Determining Blood Type
To determine blood types, antiserum is used. The serum contains antibodies that may react with antigens on the RBC surface.
If using anti-A antiserum (contains anti-A antibodies) and the blood sample agglutinates (clumps), this indicates the presence of A antigens.
Which blood types have A antigens? Fill up in the type. Type _____ and Type _____
If using anti-B antiserum (contains anti-B antibodies) and the blood sample agglutinates (clumps), this indicates the presence of B antigens.
Which claret types have B antigens? Fill in the type. Type _____ and Type _____
If using anti-Rh (anti-D) antiserum (contains anti-Rh (anti-D) antibodies) and the claret sample agglutinates (clumps), this indicates the presence of Rh antigens.
Which blood type has Rh antigens? Fill up in the type. Blazon _____
Claret Typing Data
Complete the blood typing on your samples and enter your information in Table two.1.
For each claret sample:
- Place a drop of blood in each of the three depressions of one testing tray. Each depression has a characterization of A, B, or Rh(D). One tray is used for each blood sample.
- Place a drop of the antiserum that is associated with each depression. For instance anti-A antiserum (containing anti-A antibodies) goes into the low marked A. In that depression, you will be testing to run across if the anti-A antibodies agglutinate RBCs with A antigens. Exercise the same for anti-B and anti-Rh sera into each of their depressions in the tray.
- Stir the combination of the blood and antiserum in each depression with the colour coded toothpick. Exercise not mix toothpicks across depressions.
- Examine the samples for agglutination and make full out your data table to determine the claret type for each sample.
| Using blood sample | Antiserum contains antibody Anti-A and tests for antigen A | Antiserum contains antibody Anti-B and tests for antigen B | Antiserum contains antibody Anti-Rh (D) and tests for antigen Rh (D) | What is the blood type? |
| Blood sample 1 | Agglutinated? Yep or No | Agglutinated? Yep or No | Agglutinated? Yep or No | Type: |
| Claret sample 2 | Agglutinated? Yeah or No | Agglutinated? Yes or No | Agglutinated? Yes or No | Blazon: |
| Blood sample 3 | Agglutinated? Yep or No | Agglutinated? Yep or No | Agglutinated? Yep or No | Type: |
| Blood sample 4 | Agglutinated? Yes or No | Agglutinated? Yeah or No | Agglutinated? Yep or No | Blazon: |
Table two.1 Blood Typing Data
Human Blood Microscopy and General Microscope Utilize
In this office of the lab y'all will use a microscope to examine erythrocytes, leukocytes, and platelets. These three constituents are referred to as the formed elements of blood. Platelets are not considered a cell, as they are enclosed cytoplasmic fragments. A complete blood count with differential is a clinical measure out that states the percentages of each blood jail cell type and is used for various diagnostics such as determining anemia or types of infections or allergic reactions. Erythrocytes are the most numerous claret jail cell, then the count of the dissimilar leukocytes goes from about to least numerous in this order: neutrophils, lymphocytes, monocytes, eosinophils, and basophils.
Formed Elements of Blood
Erythrocytes (Red Blood Cells)
Erythrocytes
See Figure 2.5 below and notice the numerous, round, pink cells in the groundwork each of the leukocyte images. These are ruby-red claret cells (RBCs). Some look like they take a pigsty in the eye, but this is due to the thin area of the biconcave shape that allows for flexibility and to increase surface area.
Primary function: transport respiratory gases to and from tissues.
Lack a nucleus.
Well-nigh abundant of all blood cells.
Contains millions of Hemoglobin molecules: permit for binding of O2 and CO2.
Platelets
Platelets
As well chosen thrombocytes but not technically a cell. They are produced by the fragmentation megakaryocytes that are in bone marrow tissue.
Involved in coagulation: the process of clot formation.
During coagulation, molecules (fibrin) join to form long threads that class a net to trap platelets and plug the wound.
Leukocytes (White Claret Cells)
Leukocytes
See Figure 2.5 below.
Only formed elements with a nucleus.
Lacks hemoglobin.
Travel between endothelial cells of capillaries and tissues.
2 types of leukocytes: granular and agranular.

Granulocytes
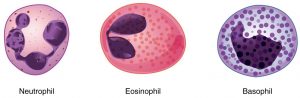
Run into Effigy two.6 beneath.
All have granules in cytoplasm.
- Neutrophils (xl-60% of full white blood jail cell (WBC) count)
- almost common WBC
- 1st to arrive at wound/infection site
- release cytotoxins
- capable of phagocytosis
- Eosinophils (ane-4% of total WBC count)
- phagocytize microbes that immune organization has coated with antibodies
- subtract inflammatory response at site of wound
- Basophil (0.5-1% of WBC count)
- release histamines (cause vasodilation) and heparin (prevents clotting)
- important in allergies
Agranulocytes
Refer dorsum to Figure two.5
Fewer and less obvious granules in cytoplasm.
- Monocytes (two-8% of total WBC count)
- wanderers, patrol trunk tissue for microbes and worn-out tissue cells
- 2d to go far at wound site
- phagocytize dead cells/debris that has accumulated at site of wound/infection
- Lymphocytes (20-40% of WBCs)
- smallest leukocyte, arable in bloodstream, occur in lymph nodes and glands
- specialized lymphocytes:
- T-cells: attach to and destroy infected or malignant cells past releasing cytotoxic molecules and secreting antiviral/proinflammatory molecules
- B-cells: industry antibodies that attach to foreign pathogens/cells and aid destroy them
- Natural Killer cells: can detect ill, cancerous, and infected cells and release cytotoxic molecules to destroy them
Follow the instructions below for microscope use, and examine a human being blood smear. Sketch each of the formed elements of blood as seen in your view.
Microscope Parts and How To Handle Them
At that place are many different types of microscopes. We shall learn almost the chemical compound light microscope. It uses visible light to visualize the specimen, and passes that lite through two divide lenses to magnify the image. Chemical compound microscopes have a lot of moving parts and can be damaged and cleaved through mishandling. A large function of learning how to use the microscope properly involves learning how to avoid dissentious it. To practise that, yous get-go have to exist familiar with the parts.
In Figure 2.7, at that place are two compound microscopes shown with primal parts identified. The ane on the left is monocular and the one on the right is binocular. Many of the parts of the two microscopes are in slightly different locations.
When you lot showtime sit in front of a microscope, take a moment to find the key parts, especially the knobs for focus, condenser aligning, and stage control. When viewing a specimen, your eyes volition exist at the eyepieces (oculars), and if yous grab the wrong knob by accident, you lot can lose your epitome or damage the microscope.

Eyepiece (Ocular)
The eyepiece contains the eyepiece lens, one of the two lenses doing the magnifying in a compound microscope. If the microscope is binocular, utilise both eyepieces, adjusting them to ensure they fit the spacing of your eyes. For successful binocular viewing, bring your epitome into focus with the lowest ability objective, while looking through merely the not-adjustable ocular. Then while looking only through the adjustable ocular, rotate its focus ring to bring that ocular into clear focus. Now the paradigm should be clear as you expect through both oculars.
Carrying arm
When moving a microscope, even if it is simply a few inches, always pick it up by the carrying arm. Do not drag the microscope: pick information technology up. The microscope volition have safety feet that prevent it from sliding, so if you endeavour to drag it, it will shake and vibrate and peradventure harm parts. Never selection upward the microscope by any part other than the conveying arm. The other parts are generally much more delicate and prone to breaking.
Objective lenses
Nigh compound light microscopes will contain three to 4 objective lenses that can be rotated over the slide. Sometimes these lenses are merely chosen objectives. When a particular objective has been fully rotated into position, you will feel a click as that objective locks into identify. The objective lens is the 2nd of the ii lenses doing the magnifying in a compound microscope, so if it is not snapped into proper position, you will not see the proper prototype. Each objective lens tin can usually be unscrewed from its position in the rotating turret that houses it, then be conscientious yous are rotating the turret, not unscrewing an objective. Do not unscrew the objectives from the turret. Each objective lens has a different magnifying power, so the image on your slide volition be magnified to lesser or greater extents, depending on which objective lens you accept called. Each objective'south magnification power will be written somewhere on the side of the objective.
Stage and stage clips
The slide will be held in identify on the stage with phase clips that printing confronting the sides of the slide. The clips exercise non sit down above or below the slide. They are spring-loaded to agree the slide edges and lock the slide in place and then that the stage controls tin move the position of the slide smoothly.
Stage controls
These allow yous to move your slide while y'all are viewing information technology, simply but if the slide is properly clipped in with the stage clips. Find the phase control dials on your microscope before yous start viewing your slide. There are two dials—1 moves the slide left and right, the other moves the slide upward and downwards. Notice in Effigy two.seven, the dials are on top of each other and below the stage on the binocular microscope, however, they are ii carve up dials and above the stage on the monocular microscope.
Coarse focus
This is the larger of the two focus knobs. Use it with the everyman power objective to get the specimen approximately in focus. Afterward that, just employ the fine focus knob, fifty-fifty after you change to a college-power objective. Detect in Figure 2.7, the binocular microscope fine focus knob is surrounded by the coarse focus knob, nevertheless, the monocular microscope fibroid focus and fine focus knobs are separated.
Fine focus
This is the smaller of the two focus knobs. This is the focus you will utilize repeatedly in viewing slides once they are focused with the coarse focus.
Condenser position adjustment
You typically will not need to conform this knob. Information technology controls how far the lite condenser is from the slide, which should be properly adjusted before you apply the microscope.
Condenser opening adjustment (not shown in effigy)
This opening can be adapted, normally by rotating a band around the condenser. Be sure this has not been left closed past a previous user. Experiment with dissimilar opening sizes to determine what is best for your specimen.
Iris diaphragm lever
Find the lever nether the stage where lite passes through to the slide. Information technology opens and closes an iris to allow more or less light through the slide. In some specimens there is non much dissimilarity betwixt the colours and shades of the different components being magnified. Changing the view by adjusting the iris tin can allow you to better see some of the details y'all are trying to magnify.
Rheostat: Light intensity (not shown in figure)
Rotate this dial to suit the brightness of the low-cal source. Turn this to its a low setting before looking through the eyepieces. You may need to increment the intensity as y'all increase the power of your objective. Turn the rheostat all the fashion down before turning off your microscope.
Lab exercises
Conduct out the activities listed below and answer the questions.
- Option up your microscope and bring it close plenty that y'all can wait into it comfortably from where you lot are sitting with healthy posture. Suit information technology and then that the phase is facing you and the eyepieces are rotated toward you. What function of the microscope did you grab in order to pick it up and movement it?
- Where are the locations of the two stage adjustment knobs on your microscope?
- Where is the location of the fibroid focus knob?
- Where is the location of the fine focus knob?
- Is in that location a condenser opening adjustment ring?
- Find the diaphragm lever. Looking in the hole in the center of the stage, what happens when you motility the diaphragm lever in each direction?
- Afterward cleaning a slide as instructed by your professor, identify the slide on the stage.
- Have the steps described in the ocular department to obtain clear view through both of your oculars. If you wear spectacles, try with and without to decide which is best for you.
- Conform the condenser opening and iris lever. How does this change your view?
Checking out and storing the microscope
When you finish your microscope work with the blood slide, be prepared to accept your teacher check off each of these items before putting abroad your microscope.
- Plow the rheostat to its dimmest setting.
- Turn off the power, unplug, and wrap the cord around the base.
- Wipe the objective lenses with methanol and lens paper. Notice this is lens paper, not kimwipes. Using any paper other than lens newspaper tin can scratch the lens.
- Rotate the objective lens turret and so the lowest power objective faces down.
- Wipe the stage clean with a kimwipe and move it to the everyman position.
"Blood Lab" is MODIFIED from:
- Anatomy and Physiology by Open up Stax / CC BY 4.0. Download for gratis at http://cnx.org/contents/14fb4ad7-39a1-4eee-ab6e-3ef2482e3e22@12.eight.
- An Overview of Claret, Anatomy and Physiology past Open Stax / CC Past 4.0. https://cnx.org/contents/FPtK1zmh@12.viii:IUrEdFyf@ten/An-Overview-of-Blood
- UGA Anatomy and Physiology two Lab Manual past University System of Georgia / CC BY four.0
- Homo Anatomy and Physiology Lab (BSB 141) by Lumen Learning / CC BY-SA
- A&P Labs. Authored past: Ross Whitwam. Provided past: Mississippi Academy for Women. Located at: http://www.muw.edu/. License: CC BY-SA: Attribution-ShareAlike
- Labeled compound low-cal microscope. Authored past: Ross Whitwam. Provided by: Mississippi University for Women. Located at: http://www.muw.edu/. License: CC By-SA: Attribution-ShareAlike
Citation notes:
- Hesse, DeLoris; Cozart, Deanna; Szymik, Brett; and Nichols, Rob, "UGA Anatomy and Physiology 2 Lab Manual" (2017). Biological Sciences Open up Textbooks. 14.
https://oer.galileo.usg.edu/biological science-textbooks/fourteen
"Microscope Parts and How to Handle Them" is MODIFIED from:
- Lumen Learning. CC BY-SA https://courses.lumenlearning.com/ap1x9x1/chapter/the-parts-of-a-chemical compound-microscope-and-how-to-handle-them-correctly/
- A&P Labs. Authored past: Ross Whitwam. Provided past: Mississippi University for Women. Located at: http://world wide web.muw.edu/. License: CC Past-SA: Attribution-ShareAlike
- Labelled compound light microscope. Authored past: Ross Whitwam. Provided by: Mississippi University for Women. Located at: http://www.muw.edu/. License: CC BY-SA: Attribution-ShareAlike

Blood Hematocrit Virtual Lab Answers,
Source: https://pressbooks-dev.oer.hawaii.edu/shook/chapter/chapter-2-blood-lab/
Posted by: johnstonyoulle.blogspot.com
0 Response to "Blood Hematocrit Virtual Lab Answers"
Post a Comment